Showing posts with label vitamin K. Show all posts

Thursday, October 25, 2012

Swiss Chard: The Vegetable Valedictorian


It's blatantly obvious by now that I love the farmer's market. I love that the air is getting colder outside, but I'm beginning to dread the day when the farmer's market isn't bursting with color like normal. New York gets especially bleak in the winter - bare tree limbs, whipping winds, blustering snow storms - and shopping at the grocery store instead of the farmer's market just makes me want to cry! Why, Mother Nature? Why?

When we left the campsite last weekend in Beacon, we had just enough time to stop by the Sunday farmer's market on the Hudson River. We quickly scoped the wares and settled on a beautiful bunch of Swiss chard and two bunches of breakfast radishes (these babies are hard to find, so we got double!). 

You've probably seen Swiss chard many times. It's readily available in stores year-round. It has huge, dark green leaves and colorful stems that range from red or orange to yellow or white. It's truly a beautiful vegetable. Though it's name is deceiving, Swiss chard originated in Sicily. It has been a staple of the Mediterranean diet for thousands of years. It's a Chenopod (or herbaceous flowering plant), along with spinach, beets and quinoa. In fact, you cook it in a similar way to spinach and it has the earthy flavor of a beet, but I think it most closely compares to collard greens or kale in it's texture and flavor (but that could just be me and my crazy Southern influence).

Now to the most important part... why you should eat it! Swiss chard is...

Image courtesy of gonola.com
PACKED WITH VITAMIN K - In fact, 1 cup of cooked chard has approximately 700% of your daily value. Vitamin K keeps your bones strong, and supports proper functioning of the brain and nervous system.

CHOCK FULL OF ANTIOXIDANTS - Swiss chard is one of the most antioxidant-rich foods on the PLANET! It's vivid colors should tell you that! Chard contains 13 different polyphenol antioxidants which help you fight disease!

FULL OF FIBER - The fiber in chard (especially in the colorful stems) helps reduce your cholesterol, keeps your digestive system happy and allows your body to maintain normal blood sugar levels. One cup of cooked chard contains approximately 14% of your DV.

BURSTING WITH VITAMINS A & C - One cup of cooked chard contains 214% of your DV of vitamin A (for healthy vision, skin, teeth and mucous membranes) and almost 50% of your DV of vitamin C (for a strong immune system, normal connective tissue and healthy iron levels).

LADEN WITH LUTEIN - Lutein is essential for eye health. Research suggest that you get between 6,000 and 10,000 mcg of lutein per day. Looks like it's your lucky day then! That same 1 cup of cooked chard contains approximately 9, 276 mcg. Done and done!

BRIMFUL OF BIOTIN - You need this vitamin for hair growth and strength. One cup of cooked chard contains 1/3 of your DV. Healthy locks, here we come!

Ok, now that you know how good it is for you, what the hell should you do with it? That part is easy! Boiling is the most recommended method for cooking chard because it allows the oxalates in the chard to escape. Oxalates can hinder the body's ability to absorb calcium and are good to avoid if you suffer from kidney stones.

In addition to boiling, I also like to saute it, which is pretty easy when you're in a hurry. Here's a photo play-by-play of the chard we cooked this week...

Chop off the stems of the chard... If some of your leaves have larger veins running up the middle, you can cut those
off as well. The stems are edible, but because they take longer to cook and I was in a hurry, I chose not to.
Wash the leaves in a bowl of cold water - this should be done a few times to ensure that they are clean.
Pat the leaves dry and slice into 1 inch strips.
Finely dice 3-4 cloves of garlic. The more the merrier in my book (unless you have a date later, then this
would be a horrible idea)!
In a large saute pan, saute the garlic in a few tablespoons of extra virgin olive oil. I LATER learned that you
shouldn't use an aluminum pan because of the reaction the oxalates will cause. It will destroy your pan.
Don't say I didn't warn you.
Once the garlic has cooked for 2-3 minutes, add the Swiss chard and saute until wilted.
Getting close....
Almost there...
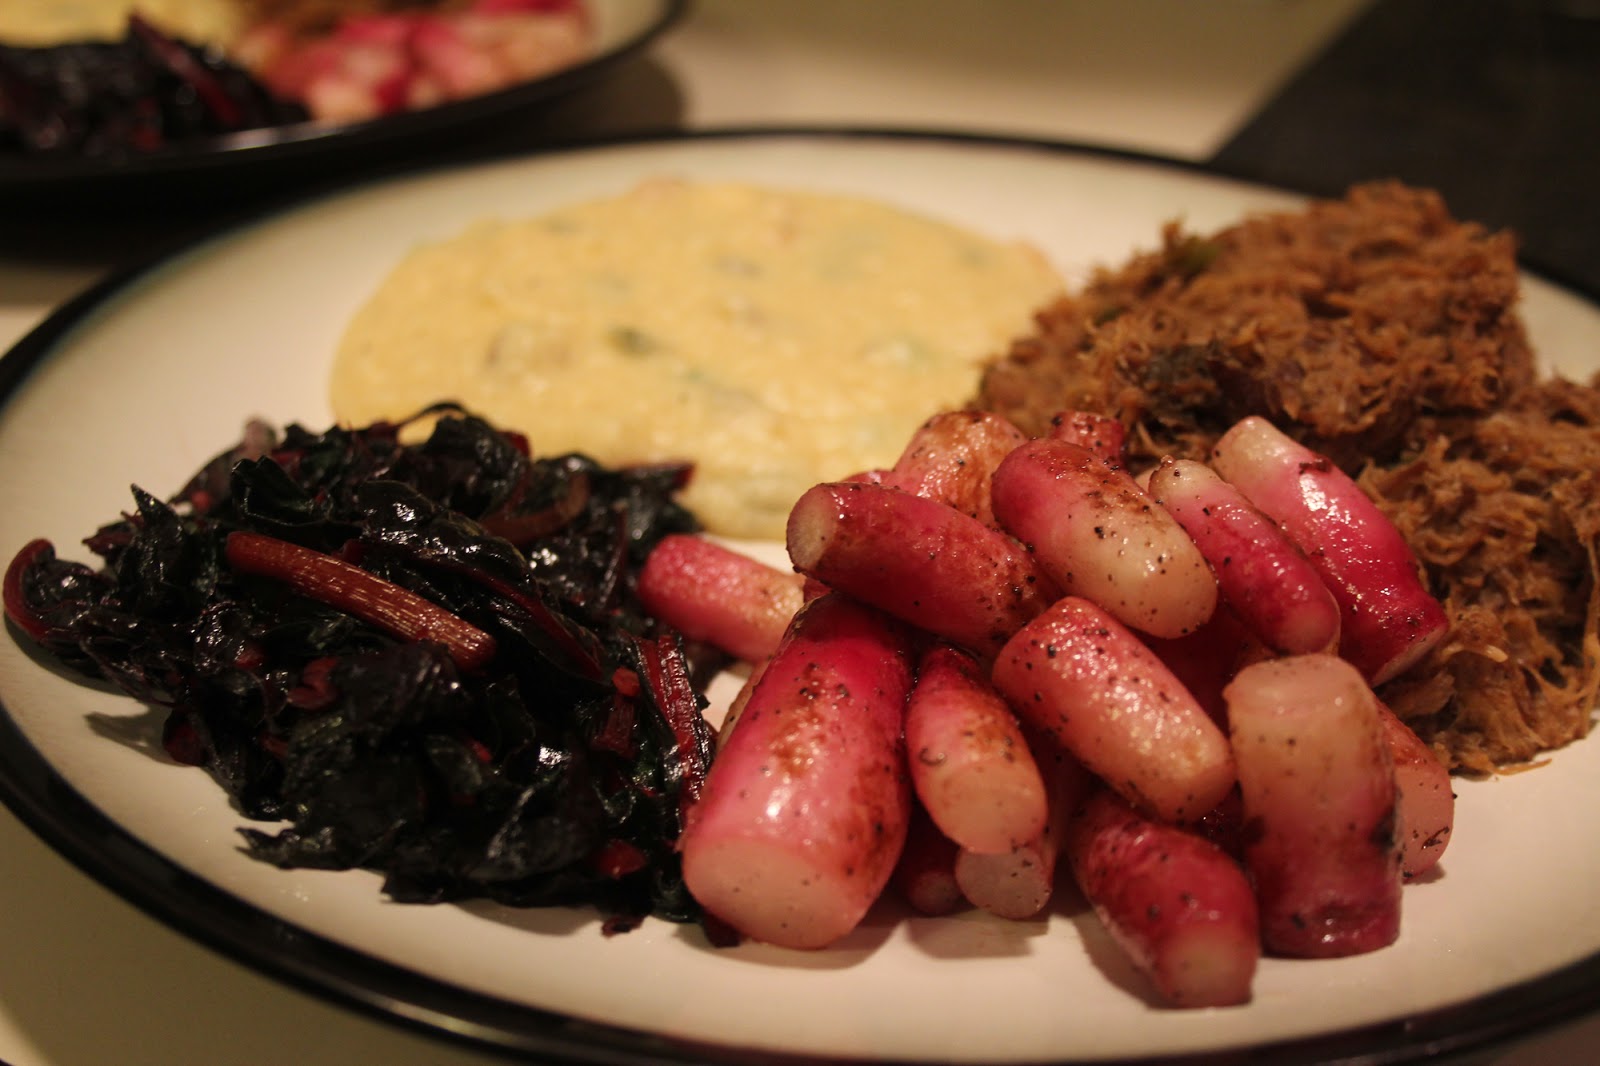
And that's how you do dinner on the fly! Reheat homemade free-range pulled pork and potatoes, saute breakfast
radishes and Swiss chard! Ta da! (P.S. Breakfast radishes are my jam and will be covered next week!)

Swiss chard is great because it goes with just about anything! You can throw it into your eggs, include it in a stirfry or pasta dish, make it into a tasty stand-alone side dish or even juice it! Now hopefully you have more time than me when you are cooking your beautiful batch of chard. If so, you should try these recipes that I was drooling over and then report back...


LEEK, CHARD AND CORN FLATBREAD


SWISS CHARD, CHIVE & GOAT CHEESE PASTA


Wednesday, August 29, 2012

Napa Cabbage: From Koreatown To Your Kitchen

Image courtesy of westsidecommunitymarket.org
"Mommy? Where do babies come from?"

These words strike fear into the hearts of parents everywhere. That's why today's post will be extremely helpful in more ways than one because if you haven't heard already, babies come from today's vegetable, the cabbage. Cabbage patches, to be exact. I've seen a delivery live - up close and personal - at BabyLand General Hospital in Cleveland, Georgia.

Image courtesy of stingaling.wordpress.com
There's your answer. THAT, my friends, is how you answer the dreaded question when asked by your five year old. Problem solved. You can thank me later.

In addition to bringing forth life (I kid, I kid), cabbages are pretty stellar in the way of nutrition. In keeping with my Asian theme for the week, I'd like to focus on the Napa cabbage (or Chinese cabbage), which dates back to the fifth century A.D. Some suspect that this cabbage variety is a cross between bok choy and turnips. If that's true, no wonder I like it.

Napa cabbage is a slightly milder and sweeter version of your average green cabbage. It's oblong in shape and has large, tightly clustered light green and yellow leaves. It's the main ingredient in Korean kimchi (as mentioned in Sunday's post), but you can find Napa cabbage in many dishes because it's extremely versatile.


Here are a few of the reasons you should incorporate Napa cabbage into your diet...

FOLATE FRIENDLY - Napa cabbage is packed with folic acid, which your body needs to make and maintain cells. Folic acid also protects your DNA from cancer-causing mutations and helps support the proper growth of the fetus in pregnant women. Ladies, you might also like to know that oral contraceptives can inhibit your folic acid absorption, so Napa cabbage can help you pump your system with extra folic acid.

AN ANTIOXIDANT ALLIE - It goes without saying that this cruciferous vegetable is full of antioxidants. Antioxidants help fight cancer-causing free radicals in the body. You want lots of these in your diet!

FULL OF FIBER - Raw Napa cabbage contains both soluble and insoluble fiber, which contribute to healthy digestion and overall wellness.

BONE BUILDING - Just 1 cup of raw shredded Napa cabbage provides you with 38% of your daily requirement of vitamin K. This vitamin ensures bone health, delays osteoporosis and even helps delay the progression of Alzheimer's.

DISEASE DESTROYING - You'll also get 46% (almost half!) of your daily requirement of vitamin C, which protects your body from disease and infection.

WEIGHT LOSS WONDER - That same cup contains only 20 calories! Napa cabbage can help you feel full without consuming a lot of fat and calories.


I know what you're thinking... This is all great news, but what do I do with it? That parts easy! You can use it as a wrapper or tortilla. Just wash a leaf and fill it full of goodies! You can also slice it into tiny shreds and make an Asian slaw or add it to your regular salad green of choice to spice up your salad. I like to cut it into pieces and throw it into a soup or stirfry. The leaves absorb flavor very well and do great in either.

This past weekend, Adam and I made our version of a vegetable pho with Napa cabbage. The beauty of this recipe is that you can use it as a basic framework and make it with whatever vegetables you like! There's a lot of chopping involved (don't say you weren't warned), but it will feed an army when you're done.

Separate the cabbage leaves and slice into 1 inch squares.
Leave a few leaves whole for the spring rolls you're going to make later. 
Peel and slice 1 white onion. You're aiming for crescent moon shaped slivers.
Thinly slice 4-5 carrots... organic preferably! Save some whole carrots for spring rolls too.
Add a little olive oil to the bottom of your large soup pot and saute the cabbage, onions and carrots for about 5-10 minutes until they are cooked. Throw some salt and pepper in there while you're at it.
Once the veggies are cooked, you need to make some broth! You can either add water (as much water as you want soup) with 2-3 vegetable bouillon cubes or fill with half vegetable broth/half water. Whichever you prefer. Also add 1 Tbs. of soy sauce and 1 Tbs. of minced fresh ginger.
Bring the soup to a boil for 1-2 minutes, then turn the heat down to
low-medium. In a separate pot, cook your udon or soba noodles (they cook fast, 2-3 minutes tops).
While the soup is simmering, add whole snap peas (or snow peas) and shiitake mushrooms (wash them first please!).
When the mushrooms and peas have cooked through, you're done! Just add the noodles to a bowl
and pour the soup on top!

Now that you've chopped a lot of veggies (way more than will fit in the soup), you can use the leftovers to make a side of spring rolls. You can find spring roll wrappers in the dry food aisle of the supermarket. They look like rice paper. For mine, I used shredded Napa cabbage, mung bean sprouts, thinly sliced carrots, fresh basil leaves and fresh cilantro. To make them, dip the spring roll wrappers in water (one at a time) until they soften slightly (not too long, or they'll become mushy). Place the wet wrapper on a cutting board or plate and fill the center with a small pile of ingredients (not too much or it will be hard to wrap. Fold down the top edge over the ingredients, then fold up the bottom edge. Now you're ready to roll from left to right, tucking under the ingredients as you go. They're not always beautiful, but they're guaranteed to be yummy and packed with nutrients!

For the dipping sauce, here's a solid recipe to follow: Peanut Dipping Sauce. Or make your own, by combining natural peanut butter with a little water, a hint of sesame oil, as much chili paste as you can handle, minced garlic and minced ginger. The key is to thin out the peanut butter so that it has a better consistency for dipping. Keep adding until it tastes good to you!


Dinner is served! Drumroll please...


Wednesday, August 8, 2012

A Lonely Legume: Eat Yo' Peas, Please!


Image courtesy of peasrecipe.com
I can only speak for myself here, but I grew up hating peas, or English peas as we called them. I really despised those buggers. Their presence on my plate told me two things... 1) my mother loved me enough to feed me vegetables, but 2) she clearly wanted to ruin my life. They tasted like dirty swamp water.

I pushed those peas around my plate with gusto, hoping against hope that they would suddenly vanish from my plate or maybe just give the impression that I ate a few. If my parents had allowed our dog Hank into the kitchen during dinnertime, I would've definitely flung him a few. Hate is a strong word, but it is the only word appropriate for my feeling towards those little green globes of swamp water.

So you can imagine my surprise when I decided to give green peas another try, and I actually LIKED THEM this time! Then, when I started reading up on their nutritional benefits, I liked them even more. I can only compare the feeling to that of seeing the biggest dork in high school at your reunion and finding out he's magically transformed into a Brad Pitt look-alike. Pleasant surprise mixed with the thought of 'what have I missed out on?!?'.

Green peas (also called sweet peas or English peas) are one of the most nutritious legumes, yet they seem to be largely ignored (probably because we all hated them as children). They are believed to have originated in the Sub-Himalayan plains of northwest India and have been traced back thousands of years (we're talking BC, not A.D.).


Here's why you should give them another try...

HEART HELPERS - Green peas are packed with omega-3's and antioxidants.

CANCER FIGHTERS - The phytonutrients in green peas act as health protectors, fighting cancer-causing free radicals in the body.

BLOOD SUGAR REGULATORS - The high dietary fiber and protein content of green peas can help regulate your blood sugar and lower your risk for type 2 diabetes (1 cup of raw peas provides 30.3% and 14.7% of your daily values respectively, based on a 2000 calorie diet)

FATIGUE FIGHTERS - Green peas provide a significant, non-animal source of iron, a nutrient that fights fatigue, helps in proper blood cell formation and carries oxygen throughout the body.

FAT BLASTERS - One cup of raw peas has only 1/3 gram of fat and 115 calories.

EYESIGHT ENABLERS - The lutein found in peas helps to reduce the risk of macular degeneration and cataracts.

VITAMIN PROVIDERS - One cup provides 44.6% of your DV of vitamin K (for bone building) and 32.5% of vitamin C (for immune support).


When buying fresh peas in the pod, look for pods that are smooth and consistent in color. I really like buying them fresh because you get to shell them. It's really easy and can be really cathartic... the kind of therapy you don't have to pay the big bucks for!

To ease myself back into the pea game, I tried this recipe from SmittenKitchen.com (but I added shrimp because I felt like it, ok?). I've attached simple step-by-step instructions and pictures for your viewing pleasure. It was incredibly flavorful and sooooo good that I hardly noticed my pesto was made from peas!  
http://smittenkitchen.com/blog/2011/06/linguine-with-pea-pesto/

To prep, toast the pine nuts in the oven at 350 degrees for 5-10 minutes, watching them closely to prevent them
from burning. Pine nuts can be expensive (like $30 per lb.), so you can always
substitute them with raw cashews or almonds.
Shell your fresh peas. This part should be fun! Get the kids involved! 
Peel and devein the shrimp.
Bring the water to a boil and cook the linguine until al dente (when draining, reserve 2 cups of the pasta water for later). You can use whole wheat pasta if you want to make it extra nutritious!
In a small saucepan, bring lightly salted water to a boil. Add the green peas and cook for 2 minutes. Drain the peas,
then transfer them to an ice bath for a minute and drain again.
In a food processor, add the peas (setting 1/2 cup aside for later), pine nuts, garlic and salt. Now add the parmesan cheese... and blend for 2-3 minutes, scraping down the sides if necessary.
While it's mixing, drizzle in a bit of olive oil.
While your sous chef is busy manning the food processor, saute your shrimp in a little olive oil and garlic.
Add the cooked pasta and pea mixture to the pan of cooked shrimp. 
Add in the extra peas you saved and as much of the reserved pasta water as you need
to make the pesto mixture combine more easily. Salt and pepper to taste.
Serve it up while it's hot and chow down! Nom nom nom!


Here are a few more pea recipes to get your wheels turning...

MINTED PEAS & RICE WITH FETA:
http://www.eatingwell.com/recipes/minted_peas_rice_with_feta.html
Image courtesy of eatingwell.com


GREEN PEA SOUP:
http://www.chow.com/recipes/29519-green-pea-soup
Image courtesy of chow.com


My grandmother calls me 'sweet pea'. I guess my love for them was meant to be.


Thursday, August 2, 2012

The Advantages of Avocado: Love It, Hate It...Either Way, Eat It!

Image courtesy of freedigitalphotos.net
My favorite holiday is Cinco de Mayo. Well, maybe Christmas... but Cinco de Mayo is definitely a close second. I adore Mexican food. In my 'former life', when I lived in Atlanta and was surrounded by cheap Mexican restaurants, I would sometimes go for lunch and order queso (my death row dish of choice) twice a week. It's really a miracle I didn't gain 1,000 pounds. I made people take me for Mexican on my birthday every single year. Sometimes I wore a sombrero. Mexican food is serious business in my book.

With all that said, I'm sad to admit that I have an extreme lack of enthusiasm for guacamole (Earth to Lauren! You LOVE Mexican. Get with the program!). Something about avocado just doesn't sit well with my taste buds. Frankly, I'm disappointed in them.

Despite their lack of enthusiasm, I've been trying to incorporate avocados into my diet because, well, they're just packed with so many good things! I hate to miss out on a good nutrient party.

Image courtesy of merchantcircle.com

There are more than 80 varieties of avocados, the most common in the United States being the Hass avocado or the 'alligator pear', a reference to it's dark green color and bumpy texture. Avocados have the highest protein content of any fruit, making it a great choice for people who want to incorporate plant-based protein into their diets.

  • Avocados are packed with 'good' fats, polyunsaturated and monounsaturated.These fast help lower your LDL (bad) cholesterol and help raise your HDL (good) cholesterol.
  • Avocados contain more potassium than a banana, the 'potassium poster-child'. Potassium plays an important role in metabolic function and muscle growth.
  • Avocados are rich in B vitamins (which help the immune system fight disease and break down protein), vitamin C (for growth and development), vitamin E (for healthy skin and hair and free-radical fighting) and vitamin K (which is responsible for blood clotting).
  • Avocados contain folate, which is instrumental in the development of healthy cells and tissues (folate is very important for pregnant women and infants).
  • Avocados are an excellent source of fiber, which aids in proper digestion.

Avocados can be a bit intimidating when it comes to picking them out and knowing when they're ripe. Here's a fantastic chart explaining what the avocado looks like in each stage of the ripening process... http://www.avocadocentral.com/how-to/how-to-pick-how-to-buy-avocados  You'll know it's ready to eat when it yields slightly to firm pressure, and if you need to speed up the process, you can put it in a paper bag as it ripens. 

My friend Katie found this amazing recipe for tilapia burgers with watermelon salsa and avocado http://www.howsweeteats.com/2012/05/tilapia-burgers-with-watermelon-salsa-avocado/  It met my standards for sufficiently disguising the taste of avocado and tricking my taste buds into submission. Here's a play-by-play on how to make them (minus measurements...that's what the recipe link above is for!).

To make the watermelon salsa, finely dice the garlic.
Remove the insides of half a jalapeno and...
chop finely.
Wash and chop a small head of cilantro.
Finely chop a red onion.
Dice the watermelon into small pieces.
Combine all the ingredients and set your salsa aside.
Finely chop the tilapia (or use a food processor).
Mix the remaining ingredients in a bowl (bread crumbs, spices, eggs).
Add the tilapia to the bowl of remaining ingredients...
and form burger patties (try not to make them too thick).
When the olive oil in your skillet is piping hot, cook the burgers for 3-4 minutes on each side or until brown.
When they're done, they'll feel firm when you press against the top.
Toast your wheat buns, layer with the burger, avocado slices and watermelon salsa. Ta-da! You're done and look
how impressive this looks! 


And if you just can't get enough avocado, here are some more amazing recipes to try...


ANCHO CHICKEN TACOS WITH CILANTRO SLAW & AVOCADO CREAM:
Image courtesy of myrecipes.com


ROASTED CARROT AND AVOCADO SALAD:
Image courtesy of smittenkitchen.com


SPICY TORTILLA SOUP WITH SHRIMP AND AVOCADO:
Image courtesy of myrecipes.com